
Best Battery for Solar Panel:
12V, Lithium & Deep Cycle Complete Guide (2026)
Choosing the right battery for solar panels is arguably the most important decision in any off-grid or backup power system. The panels generate electricity — but without the right battery, that energy is wasted the moment the sun goes down. The wrong battery chemistry, size, or connection method can cut your system’s lifespan in half and cost you thousands in replacements.
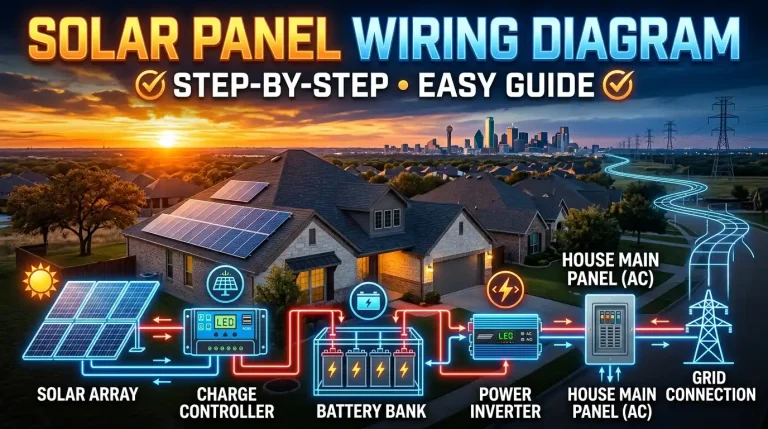
This guide covers everything: the best batteries for solar panels in 2026, how to size and connect them, solar panel battery charger for car applications, complete solar panel kit with battery recommendations, how long they last, and the real story on solar panels without battery systems.
The best battery for solar panels in 2026 is a LiFePO4 (lithium iron phosphate) deep cycle battery. It lasts 3,000–6,000+ cycles (10–15 years), charges 4× faster than lead-acid, allows 80–100% depth of discharge, and has 95%+ round-trip efficiency. For budget builds, AGM deep cycle batteries are the best lead-acid alternative.
1. 4 Types of Solar Panel Batteries: Full Comparison
There are four main battery chemistries used for solar storage in the US. Here’s what you need to know about each before buying:
LiFePO4 (Lithium Iron Phosphate)
- Lifespan: 3,000–6,000+ cycles
- Depth of discharge: 80–100%
- Round-trip efficiency: 95–98%
- Weight: 50% lighter than lead-acid
- Maintenance: Zero
- Cost: ~$400–$800 per 100Ah (12V)
AGM Deep Cycle (Lead-Acid)
- Lifespan: 500–1,000 cycles
- Depth of discharge: 50%
- Round-trip efficiency: 80–85%
- Weight: Heavy
- Maintenance: None (sealed)
- Cost: ~$150–$250 per 100Ah (12V)
Gel Battery (Lead-Acid)
- Lifespan: 500–800 cycles
- Depth of discharge: 50–60%
- Round-trip efficiency: 80–90%
- Weight: Heavy
- Maintenance: None (sealed)
- Cost: ~$200–$350 per 100Ah (12V)
Flooded Lead-Acid (FLA)
- Lifespan: 300–500 cycles
- Depth of discharge: 50%
- Round-trip efficiency: 75–85%
- Weight: Heaviest
- Maintenance: Add water monthly
- Cost: ~$80–$150 per 100Ah (12V)
Full Battery Chemistry Comparison
| Factor | LiFePO4 | AGM | Gel | Flooded Lead-Acid |
|---|---|---|---|---|
| Cycle life | 3,000–6,000+ | 500–1,000 | 500–800 | 300–500 |
| Usable capacity (DoD) | 80–100% | 50% | 50–60% | 50% |
| Round-trip efficiency | 95–98% | 80–85% | 80–90% | 75–85% |
| Weight (100Ah, 12V) | ~26 lbs | ~60 lbs | ~65 lbs | ~70 lbs |
| Maintenance required | None | None | None | Add water monthly |
| Built-in BMS | Yes | No | No | No |
| Upfront cost | Highest | Low-Medium | Medium | Lowest |
| 10-year total cost | Lowest | Medium | Medium | Highest (replacements) |
| Best for | All solar systems | Budget off-grid | Hot climates | Very tight budgets |
2. Best Battery for Solar Panels in 2026
After analyzing the data, here are the top picks for best batteries for solar panels across every use case in 2026:
🥇 Best Overall: LiFePO4 Lithium Ion Batteries for Solar Panels
Lithium ion batteries for solar panels — specifically LiFePO4 chemistry — are now the industry standard. LiFePO4 lithium batteries provide a longer life, better performance in a wide temperature range, and true deep-cycling ability. Market data in 2026 shows installed battery costs around $1,300 per kWh before incentives, and roughly $1,000 per kWh after the 30% federal tax credit.
- Battle Born LiFePO4 100Ah 12V — US-made, 3,000+ cycles, 10-year warranty. Premium choice for RV and off-grid.
- Renogy Smart Lithium Iron Phosphate Battery — Bluetooth monitoring, built-in BMS, 2,000+ cycles. Great value for home systems.
- Ampere Time (now LiTime) 100Ah LiFePO4 — Best budget lithium option. 4,000+ cycles, UL-certified, under $280 per 100Ah.
- EG4 LiFePO4 48V — Best for whole-home backup systems. Stacks to 20kWh+, compatible with major inverter brands.
🥈 Best Budget: Deep Cycle Batteries for Solar Panels (AGM)
Deep cycle batteries for solar panels in AGM format are the best lead-acid option. Unlike starting batteries (designed for short bursts), deep cycle batteries are engineered for repeated deep discharges — exactly what solar storage requires.
- Renogy Deep Cycle AGM 100Ah 12V — Most popular entry-level solar battery in the US. Valve-regulated, no maintenance, ~$180.
- VMAXTANKS 100Ah AGM — Military-grade plates, 8–10 year lifespan for AGM, popular for RV and marine use.
- Trojan T-105 6V 225Ah Flooded — Gold standard for off-grid solar farms. Connect two in series for 12V. Long track record.
Best Lithium Ion Battery for Solar Panel by System Voltage
| System Voltage | Best Battery | Capacity | Est. Cost | Best For |
|---|---|---|---|---|
| 12V | LiTime 12V 100Ah LiFePO4 | 100Ah (1.28kWh usable) | ~$250–$300 | RV, van, boat, small cabin |
| 12V Budget | Renogy AGM 12V 100Ah | 100Ah (50Ah usable) | ~$160–$200 | Budget off-grid, backup |
| 24V | Battle Born 12V ×2 in series | 200Ah (24V = 4.8kWh) | ~$900–$1,100 | Medium cabin, larger RV |
| 48V | EG4 LifePower4 48V 100Ah | 100Ah (48V = 4.8kWh usable) | ~$1,200–$1,800 | Home backup, large off-grid |
3. Solar Panel for 12 Volt Battery: Complete Guide
The most common solar setup in the US for RVs, boats, vans, and small off-grid systems is a solar panel for 12 volt battery configuration. Here’s everything you need to know about 12v solar panel with battery systems.
How a 12V Solar Panel Charges a Battery
A standard “12V” solar panel actually outputs 17–21V at its maximum power point (Vmp) — higher than 12V because the charge controller needs headroom to regulate charging. The charge controller (MPPT or PWM) steps this down to the correct charging voltage for your 12V battery:
- Bulk charge: Controller pushes maximum current until battery reaches ~14.4–14.8V (AGM) or ~14.2–14.6V (LiFePO4)
- Absorption charge: Voltage held constant, current tapers as battery fills
- Float charge: Voltage drops to ~13.6V (AGM) to maintain full charge without overcharging
What Size Solar Panel to Charge 12V Battery
To charge 100Ah AGM from 50% (need 50Ah) in 5 peak sun hours:
(50Ah × 12V) ÷ 5h ÷ 0.85 = 141W minimum → use 200W panel
To charge 100Ah LiFePO4 from 80% discharge (need 80Ah) in 5 hours:
(80Ah × 12V) ÷ 5h ÷ 0.85 = 226W minimum → use 250W or 2×100W panels
What size solar panel to charge 12v battery — quick guide:
12V 50Ah battery → 100W panel minimum
12V 100Ah battery → 200W panel minimum
12V 200Ah battery → 400W panel minimum
Solar Panel to 12 Volt Battery: Key Rules
- Always use a charge controller — never connect panels directly to a 12V battery above 5W
- A solar panel for 12v battery charging should be sized at 10–20% of battery capacity in amps. Example: 100Ah battery → 10–20A charge current → 120W–240W panel at 12V
- 12v solar panel battery charger setups use a PWM controller for budget builds; MPPT for 30% more efficiency
- A battery for 12v solar panel system should be a deep cycle type — never a standard car starting battery, which degrades rapidly under repeated deep discharges
- A solar panel rechargeable battery system (panel + controller + battery) can be assembled for under $200 for a basic 12V/100Ah system with a 100W panel
- A mini solar panel with battery combo (10W–30W panel + small sealed battery) is perfect for garden lights, trail cameras, and remote sensors
- A solar panel with built in battery (all-in-one units like Jackery Explorer or EcoFlow RIVER) integrates panel, battery, and inverter — zero wiring required
4. Solar Battery Sizing Calculator
Correct battery sizing ensures you have enough storage for overnight use without over-buying expensive capacity. Here’s how to calculate your solar panel battery and inverter requirements:
Step 2: Autonomy days = how many cloudy days you want backup (usually 1–3)
Step 3: Battery capacity needed = Daily Wh × Days ÷ DoD ÷ Efficiency
Example: 1,500Wh/day consumption, 2 days autonomy, LiFePO4 (90% DoD, 97% efficiency):
1,500 × 2 ÷ 0.90 ÷ 0.97 = 3,436Wh = ~3.4kWh battery bank needed
In 12V: 3,436Wh ÷ 12V = 286Ah → buy two 12V 150Ah LiFePO4 batteries in parallel
In 48V: 3,436Wh ÷ 48V = 71.6Ah → buy one 48V 100Ah battery
Step 4: Inverter size = peak watt load × 1.25 safety factor
Running 1,200W of appliances simultaneously: 1,200 × 1.25 = 1,500W inverter minimum
Quick Sizing Reference by System Type
| Use Case | Daily Usage | Panels Needed | Battery Size | Inverter Size |
|---|---|---|---|---|
| Weekend RV | 500 Wh | 200W | 12V 100Ah LiFePO4 | 300–500W |
| Full-time RV | 1,500 Wh | 400–600W | 12V 200Ah LiFePO4 (×2) | 1,000–2,000W |
| Off-grid cabin | 3,000 Wh | 1,000–1,500W | 48V 100Ah LiFePO4 | 2,000–3,000W |
| Home backup | 8,000–12,000 Wh | 5,000–8,000W | 48V 200Ah+ LiFePO4 | 5,000–8,000W |
| Small boat | 300–600 Wh | 100–200W | 12V 100Ah AGM or LiFePO4 | 300–500W |
5. How Long Do Solar Panel Batteries Last? (Lifespan Guide)
The lifespan of solar panel batteries is one of the most searched questions because it directly affects your system’s long-term cost. Here’s the honest data:
Solar Panel Battery Lifespan by Chemistry
| Battery Type | Cycle Life | Calendar Life | Key Lifespan Factor |
|---|---|---|---|
| LiFePO4 Lithium | 3,000–6,000+ cycles | 10–15 years | Keep temperature 32–113°F, avoid 100% SoC storage |
| NMC Lithium-Ion | 500–2,000 cycles | 5–10 years | More energy-dense but less thermally stable than LFP |
| AGM Deep Cycle | 500–1,000 cycles | 4–7 years | Never discharge below 50%; keep fully charged in storage |
| Gel Battery | 500–800 cycles | 4–6 years | Low charge current required; avoid high heat |
| Flooded Lead-Acid | 300–500 cycles | 3–5 years | Monthly maintenance watering; equalization charging |
How Long Do Solar Panel Batteries Last in Practice?
How long do solar panel batteries last in a real-world daily-use solar system? With one full charge/discharge cycle per day:
- LiFePO4: 3,000 cycles ÷ 365 days = 8+ years minimum, often 12–15 years
- AGM: 500 cycles ÷ 365 days = ~1.4 years at full daily cycling (but most AGM users do shallower cycles, extending life to 4–7 years)
- Flooded lead-acid: 300–500 cycles = 1–3 years at daily full cycling
1. Never fully discharge lead-acid below 50% — every deep discharge removes cycles.
2. Store batteries at 50–80% charge if not used for 30+ days.
3. Keep batteries cool — every 15°F above 77°F cuts lead-acid life roughly in half.
4. Use a proper charge profile — bulk, absorption, float — never constant voltage charging.
5. Match battery voltage exactly to your system — a 12V panel charging a 24V battery via a PWM controller will undercharge permanently.
6. How to Connect Solar Panel to Battery (Step-by-Step)
Here is the correct process for connecting solar panel to battery safely and effectively:
-
1
🛒 Gather Components
You need: solar panel, charge controller (MPPT or PWM), deep cycle battery, appropriate wire (10 AWG for most 12V systems), inline fuses, MC4 connectors, and a multimeter. For a solar panel battery kit, all components come pre-matched.
-
2
🔋 Connect Battery to Charge Controller First
Critical sequence: battery first, always. Connect the charge controller’s battery terminals to the battery — positive (red) to positive, negative (black) to negative. Add an inline fuse within 12 inches of the positive battery terminal. The controller should power on and display battery voltage.
-
3
⚙️ Set Battery Type on Controller
Configure the charge controller for your battery chemistry (Sealed/AGM, Gel, Flooded, or Lithium/LiFePO4) and system voltage (12V or 24V). Incorrect settings will overcharge lead-acid or undercharge lithium batteries, reducing lifespan significantly.
-
4
☀️ Connect Solar Panels to Controller
Now connect the solar panel’s MC4 output cables (or extension cables) to the charge controller’s PV input terminals. Positive to PV+, negative to PV−. The controller will immediately begin charging if sunlight is present. Verify with the controller’s display — you should see positive PV current.
-
5
🔌 Connect Loads and Inverter
Connect DC loads to the controller’s load output terminals (adds automatic low-voltage disconnect protection). Connect the inverter directly to the battery terminals with appropriately sized, fused cables. For a solar panel to charge battery setup without an inverter, DC loads connect directly to the controller or a fused bus bar.
-
6
✅ Test and Monitor
Use your multimeter to verify: battery voltage, PV voltage at controller, and output voltage at load terminals. Monitor the system over the first 3 days — a healthy system should reach full charge in 1 full sun day from 50% discharge. Check all connections for heat or corrosion after the first week.
Never connect panels directly to a battery above 5W without a charge controller. Unregulated charging overcharges the battery, causing heat, swelling, potential battery failure, and — in worst cases — fire. A basic PWM charge controller costs $15–$25 and is non-negotiable for any real solar system. For hooking up solar panel to battery safely: always use the battery-first connection sequence.
7. Solar Panel Battery Charger for Car: Complete Guide
A solar panel battery charger for car is one of the most popular and practical solar applications — keeping a vehicle’s battery charged during storage, long trips, or as a backup charging method.
Solar Panel Car Battery Charger: Use Cases
- Solar panel to car battery — trickle/maintenance charging: A 5W–20W solar trickle charger keeps a car battery from self-discharging during storage. Connect directly to the battery’s terminals (with the small built-in diode most trickle chargers include). Ideal for classic cars, RVs in storage, boats, and seasonal vehicles.
- Solar panel for car battery charging (faster): A 50W–100W panel with a PWM or MPPT controller can fully charge a dead car battery in 4–12 hours depending on sun conditions and battery size.
- Car battery charger solar panel dashboard mount: Small folding solar panels (10W–20W) designed to sit on the dashboard or rear window — charge via the cigarette lighter port or direct battery clips. Convenient but slow — best for maintenance only.
- Solar panel for charging car battery during road trips: Roof-mounted panels on the vehicle body or a folding panel in the trunk can supplement alternator charging during long stops.
Solar Panel to Car Battery: Sizing Guide
| Goal | Panel Size | Controller Needed | Time to Charge |
|---|---|---|---|
| Maintenance / prevent discharge | 5–10W trickle | Built-in diode only | Continuous maintenance |
| Charge dead battery (50Ah car battery) | 50W | PWM ($15–$25) | 6–10 hours full sun |
| Charge dead battery quickly (50Ah) | 100W | MPPT ($30–$50) | 3–5 hours full sun |
| Charge while parked (daily top-up) | 20–40W | PWM or direct (with diode) | Maintains charge during day |
For a solar panel for charging 12 volt battery in a car, use only deep cycle batteries if you plan repeated deep discharges. Standard car starting batteries are not designed for deep cycling and will fail quickly in a solar storage application. A 12 volt solar panel battery charger setup — panel + PWM controller + 12V battery — is the entry point for most DIY solar builds.
A solar panel battery charge controller (also called a solar panel battery charger controller) is the device that manages the charging process from panel to battery. It prevents overcharging, controls charge stages (bulk/absorption/float), and protects the battery from reverse current at night. Never skip this component for any panel above 5W.
8. Solar Panel Kits with Battery and Inverter
A solar panel kit with battery bundles panels, charge controller, battery, and often an inverter into one purchase — the easiest way to start a solar system without sourcing every component separately.
Best Solar Panel Kit with Battery and Inverter by Size
| Kit Size | What’s Included | Best For | Est. Cost |
|---|---|---|---|
| 100 watt solar panel kit with battery and inverter | 100W panel, PWM controller, 20Ah battery, 150W inverter | Small cabin lighting, phone charging, fans | $150–$250 |
| 200 watt solar panel kit with battery and inverter | 2×100W panels, MPPT controller, 100Ah AGM battery, 500W inverter | Weekend RV, small off-grid shed | $400–$600 |
| 400 watt solar panel kit with battery and inverter | 2×200W panels, MPPT controller, 200Ah LiFePO4, 1000W inverter | Full-time van build, small cabin | $900–$1,400 |
| Best RV solar panel kit with battery and inverter | 400W panels, Victron MPPT, 200Ah LiFePO4, 2000W inverter-charger | Full-time RV living, serious off-grid | $2,000–$3,500 |
Top solar panel battery kit brands in the US: Renogy, EcoFlow, Jackery, Goal Zero, Bluetti, and Victron Energy. Renogy offers the best value for component kits; EcoFlow and Jackery specialize in all-in-one portable power station units with built-in solar panels. A portable solar panel and battery combo (like the EcoFlow DELTA 2 + 220W panel) is the most popular all-in-one solution for camping and emergency backup.
A small solar panel and battery combo (10W–50W panel + small sealed battery) is perfect for low-consumption applications: trail cameras, garden lighting, gate openers, weather stations, and remote monitoring equipment. These can be assembled for $30–$100 depending on storage capacity needed.
9. Solar Panels Without Battery: Grid-Tied & Direct Use
Not every solar system needs a battery. Understanding solar panels without battery vs. with-battery systems helps you choose the right setup for your needs.
Solar Panel System Without Battery (Grid-Tied)
A solar panel system without battery — called a grid-tied or grid-direct system — connects directly to your home’s electrical panel through a grid-tied inverter. Excess solar power is sold back to the utility company via net metering. During grid outages, the system automatically shuts off for safety (anti-islanding protection).
- Pros: Lower upfront cost (no batteries), zero battery replacement cost, maximizes ROI through net metering
- Cons: No power during grid outages — the system shuts down even when the sun is shining
- Best for: Homeowners in areas with good net metering rates who primarily want to reduce electricity bills
Solar Panel Without Battery (Direct DC Use)
A solar panel without battery can also power DC loads directly — water pumps, ventilation fans, and pool pumps are common examples. The device only runs when the sun is shining, which is often perfectly fine for irrigation pumps or daytime ventilation systems.
When You Need a Battery vs. When You Don’t
| Situation | Battery Needed? | Why |
|---|---|---|
| Grid-tied home with net metering | Optional | Grid acts as virtual battery |
| Off-grid home, cabin, RV | Yes — required | No grid backup for nights/cloudy days |
| Backup power during outages | Yes — required | Grid-tied systems shut off without batteries |
| Daytime-only water pump | No | Direct panel-to-pump, runs during sun hours only |
| RV / boat | Yes — required | Need power when not plugged in or in sun |
| Solar panels for 12 volt batteries in storage | Yes — it is the battery | The battery is the storage and load simultaneously |
10. RV & Camper Solar Battery Charging
Solar panel for RV battery charging is the #1 use case for 12V solar systems in the US. A properly designed RV solar system keeps your batteries topped up during the day so you have power through the night — no generator needed.
Solar Panel to Charge Camper Battery: Setup Guide
- Solar panel to charge camper battery — mount 100W–400W of panels on your RV roof using Z brackets or tilt mounts
- Run cables through a rooftop cable entry gland to an MPPT charge controller inside
- Controller connects to your 12V house battery bank — AGM or LiFePO4
- Size panels to replace your daily energy use: most RV campers use 500–1,500Wh/day
- A solar panel for rv battery charging system of 200W with a 100Ah LiFePO4 battery covers most weekend camping needs comfortably
Solar panel to charge boat battery setups follow the same principles — 12V battery bank, MPPT controller, and marine-rated panels. Boat installations need UV and salt-air resistant wiring and connectors. Use tinned marine-grade copper wire rather than standard electrical wire for any marine application.
11. Public Opinion on Solar Panels and Home Battery in California
Public opinion on solar panels and home battery in California has shifted dramatically positive in recent years — driven by PG&E, SCE, and SDG&E rate increases, the 2020–2022 wildfires causing multi-day grid outages, and California’s NEM 3.0 net metering changes that took effect in 2023.
Why California Homeowners Are Adding Batteries
Under California’s NEM 3.0 (Net Energy Metering 3.0), the export rate paid for solar power sent to the grid dropped by approximately 75% compared to NEM 2.0. This fundamentally changes the economics: instead of getting paid for solar power exported to the grid, California homeowners now benefit more from storing solar power in a battery and using it themselves during expensive evening peak-rate hours (4 PM–9 PM).
- The California Self-Generation Incentive Program (SGIP) offers rebates of $200–$1,000 per kWh for qualifying battery installations
- The federal 30% Investment Tax Credit (ITC) applies to battery storage when charged primarily from solar (as of 2026)
- Popular home battery systems in California: Tesla Powerwall 3 (13.5kWh), Enphase IQ Battery 10T, Franklin Electric aPower, and LG RESU
- The Tesla Powerwall 3 is the #1 selling home battery in California — $11,500 installed, 13.5kWh, 11.5kW continuous output
12. Solar Panel Battery Installation Guide
Proper solar panel battery installation ensures safety, maximizes battery lifespan, and keeps your system code-compliant.
Solar Panel Battery Installation: Location Requirements
- Temperature: Keep batteries in a temperature-controlled space if possible. Lead-acid batteries lose 50% capacity at 32°F and degrade rapidly above 95°F. LiFePO4 batteries have built-in BMS thermal management but still prefer 59–77°F.
- Ventilation: Flooded lead-acid batteries off-gas hydrogen during charging — they must be in a vented enclosure. AGM, Gel, and LiFePO4 are sealed and safe indoors.
- Mounting: Secure batteries so they cannot tip or slide — especially in RV and marine applications. Use battery trays or straps rated for the battery weight.
- Fusing: Install a correctly sized fuse or circuit breaker within 18 inches of the positive battery terminal. This protects against short-circuit fires.
- Labeling: Label positive and negative terminals clearly. In larger battery banks, label each battery’s position in the series/parallel configuration.
Solar Panel Battery Installation: Wiring the Bank
For multiple batteries in a bank:
- Series connection (increases voltage): Connect positive of Battery 1 to negative of Battery 2. Two 12V batteries in series = 24V bank.
- Parallel connection (increases capacity): Connect all positives together and all negatives together. Two 12V 100Ah batteries in parallel = 12V 200Ah bank.
- Equal cable lengths: In parallel banks, use equal-length cables between batteries to ensure balanced charging and discharging across all cells.
- Use busbars for 4+ batteries: A positive and negative busbar (copper bar with multiple lugs) distributes current evenly and simplifies wiring.
13. Frequently Asked Questions
🔋 Solar Battery: Key Takeaways
- LiFePO4 is the best battery for solar panels — longest life, highest efficiency, zero maintenance
- AGM deep cycle is the best budget lead-acid choice — avoid flooded batteries unless you want maintenance work
- Never discharge lead-acid below 50% — it dramatically shortens lifespan
- Always connect battery to controller first — then panels. Never connect panels directly to battery above 5W
- For a 12V 100Ah battery, use a 200W solar panel for comfortable daily recharging
- LiFePO4 batteries last 10–15 years; AGM lasts 4–7 years; flooded lead-acid 3–5 years
- California NEM 3.0 makes home battery storage essential for maximizing solar ROI
- Grid-tied systems work without batteries — but provide zero backup power during outages
- A 100W–200W solar kit with battery handles most RV, van, and small off-grid needs